Showing posts with label tutorials. Show all posts

Thursday, March 12, 2015

big metal tanker desk(top) remodel : : before and after


well, i finished my desktop... what do you think?

i layered brown craft paper in between the glass and desktop, and i decorated the brown paper with my hand carved stamps. the mushrooms are from geninne's book "making an impression" and are in white ink. the arrows were inspired by an image i saw online and are stamped in a brown ink (circling around the outside of the mushroom prints). as you can see below... with all of the light coming in from those windows and the way it reflects on the glass... the mushrooms are actually really subtle. 


it was a bit hard to photograph the rubber top in this light. i feel like i didn't really capture how awful looking it is with these photos... but you get the gist. that white looking square in the photo below is actually where the rubber is all cracked and faded. 


ordering the glass cut to fit the top solved the usability problem (that rubber was not going to clean up easy with my creative messes). but i wanted a little more... i wanted it to be "pretty" too. although i was not sure how i wanted to accomplish that. then i was inspired by a scrap of brown paper i found with white scrolls and flowers on it. i wanted that under my glass. then it hit me... i had brown craft paper... i had white ink and stamps... i could make my own pretty paper!!
i rolled the paper i had on hand across my desk and it was the exact depth of my desk... perfect. so i cut it and taped down the sides. i tested out a few different inks, stamps, and patterns on a scrap piece. then i went for it. after the ink dried, i placed the glass right on top with the paper still taped down, and then i took my exacto and ran it around the edge of the glass.


now it is done... it was really easy... and possibly the best part... i can change it any time i want.

Friday, December 12, 2014

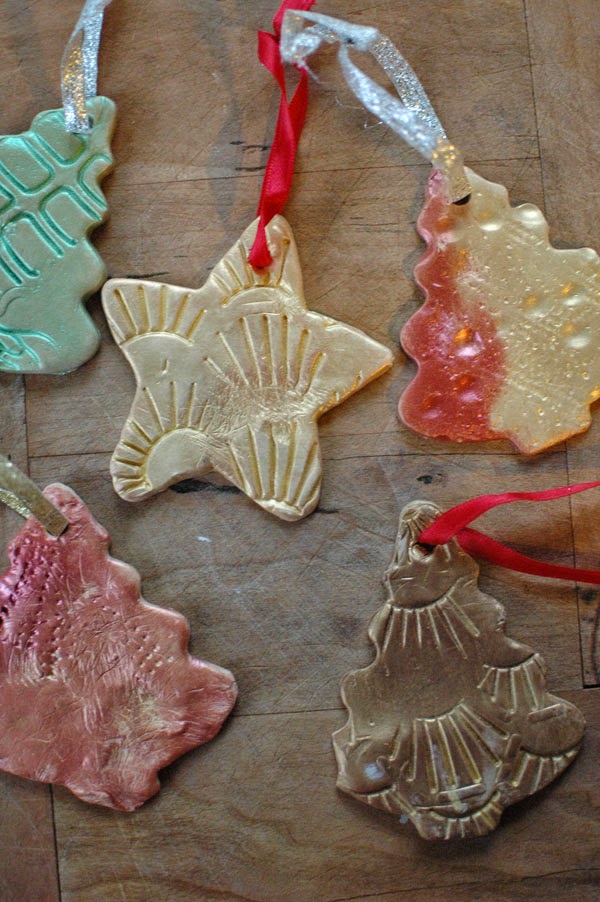
Beautiful Clay Ornaments to make with Children (or without them) : : a Tutorial


We have been making these ornaments for the last five years, and by "we" I mean my children and I.
The first year the age range was 5,3, and 6 months... and now this year the ages are 10,8,5, and 3... just to show you that even the little ones (with some help) can make these ornaments, and they always turn out beautiful. 
I have been asked how we make these, and what we use, so many times. I always explain the process and products, and for the last few years I have promised a tutorial on this blog.
So... finally... here it is...

: : Beautiful Metallic Clay Ornaments to make with Children : : 

*children not required

What you need to get started:
-A rolling pin
-Some sort of protective surface: a cutting board with wax paper, place mats. We have a couple place mats that we save just for our ornament making.
-Christmas shaped cookie cutters (or any shape really... hearts would be cute)
-A straw
-Something to make texture: We use these rubbing plates, but i really like these ones and these too. In the past we would just use whatever... strings of beads, pinecones, etc, etc... just look around and get creative.
-A paintbrush (one that could get ruined)
-Jacquard pearl-ex pigments : : find them here : : the colors we have are brilliant gold, spring green, red russet, and antique bronze. We have the 3 gram size of each and they have lasted us all five years with plenty left (except the green because it was spilled last year)
-Narrow ribbon or string

Now... lets get started...


1. The clay is very hard when you take it out of the package so you need to knead it until it gets nice and soft. Then you roll it out. I try to keep it around a quarter to a half inch thick. Although, the thickness really doesn't matter much... just not too thin or too thick... I think you'll know.
We use sculpey original oven bake clay (find it here).


2. Then you choose your cookie cutter and cut out your shape


3. Use your straw to punch a hole for your string

4. Create texture on your ornament. I used the rubbing plate above (find our set here) and just pressed it into the clay. You can find some wonderful rubbing plates here and here. Also, you can use anything to create texture on your ornaments. Our first two years we would walk around the house and collect anything we thought would make a great texture (one of our favorites was a string of beads and a prickly toy, for example)... and of course at this point in the process you can start over if you really don't like the way your texture turned out.

note: I let the kids knead the clay, then I usually roll it out, they cut their shape and punch their hole, and choose their own texture and press it into the clay


5. Protect your surface... we have a little place mat dedicated to ornament painting but for this tutorial I used wax paper on my cutting board and it worked very well.

6. "Paint" your ornament. I have a couple rules for this with the kids. They only get to pick two colors (any two colors they blend look beautiful, but when they would use all of them it would start to look a little wonky (in my opinion). also, dip the brush for them... with this pigment... a little goes a long long way.
These are jacquard pearl-ex pigments (find them here).


Above the ornament has the russet red and below the antique bronze was painted over it.


7. Place your ornaments on a cookie sheet and bake them in the oven according to the directions on your oven bake clay box. The instructions on my box say to bake them at 275 F (130 C) for 15 minutes per quarter inch of thickness.
All of the ornaments pictured below were made by my little girls....
 ages 8, 5, and 3.


8. After your ornaments are baked and cooled you add a pretty ribbon or string and I always write the name of the child that made the ornament and the year in permanent marker on the back.


As you can see... each one turns out just a bit different... and all of the imperfections just add to their beauty.

I would love to hear your thoughts and will answer any questions right here in the comments.

Happy making friends!

Wednesday, August 1, 2012

paper banner tutorial


I have been meaning to make some fabric party banners for years.... but.... i have four children and i have just not found the time. This year, when layla's party came up, i really wanted banners again and decided to throw together some quick paper banners for fun. They were very easy, i thought they were very fun to make also, and did i mention QUICK!!! Even with four children running around i managed to cut out like a hundred flags one afternoon and string them all the next evening... if i can do it.... you can definitely do it :)

materials
- coordinating scrapbook paper 12x12
- coordinating yarn (we used extra bulky and really liked it)
- darning needle (a large blunt needle used for yarn)
- scissors
- ruler
- pen
- hole punch

Each sheet of 12x12 paper makes 10 flags and a nice banner around 12 foot size will have about thirty flags on it. I purchased a notebook of coordinating scrapbook prints for $5 and it had like twenty sheets.


My paper had an extra perforated edge at the top so i removed all of those first to make them exactly 12x12. Now, it's not essential that you have 12x12 paper. That is the size that i found so i created my flag size to work with my paper. You can easily change the measurements and make any size flag you want... so don't worry too much about the paper size.


First, fold the paper in half and crease it.


Open and cut along the crease so that you have two 6x12 pieces.


Then, flip over one of the 6x12 pieces. Line your ruler up at the top and make marks at 4" and 8".


Line your ruler up at the bottom edge and make marks at 2", 6", and 10".


Then run your ruler from the top corner to the 2" mark and make a line.


Then from the 2" mark up to the 4" mark and continue in this pattern and finish with a mark coming back up from the 10" mark to the other corner.


Cut along the lines to create your flags. Now, you can either mark and cut each 6x12 sheet separately or you can do what i did. I placed the other sheet underneath and cut them both at the same time. You will end up with 10 flags and four little "half flags". If you want you could tape the half flags together and create two more flags. I just let my children play with the half flags. 


Then take your hole punch and punch holes in the top two corners of each flag.


Repeat until you have as many different prints as you want.


I had ten different prints... ten flags each print. I paired them up in various groups. Some there were just two prints, some three, some even had six prints. Then i cut various pieces of yarn... some about 10 feet.... some longer. I ran one end through the darning needle and i laced the flags on in the patterns i decided until the string was full and then i cut another string and started lacing that one. So most of my banners were about 12 feet with about thirty flags. I never measured my string though i just cut the length i wanted my banner to be and then strung it in pattern until it was full. then if i had enough left in that print for another small banner.... i would make a small one. Another thing you can remember is three flags (as pictured below) is just over a foot in length.


Hope you have fun with this! Feel free to ask if you have any questions.

Friday, May 11, 2012

some very simple blankets


Fleece blankets.... so quick and simple to make..... and so cute and warm. The brown blanket was made with a yard and a half of fleece and two packages of blanket binding. You simply pin the blanket binding along the edge of the fleece overlapping the binding edges and then sew 1/4" from the edge of the binding all the way around. The "monster" blanket is so simple it doesn't even require sewing... just a simple double knot. For the tie blanket you need a yard and a half each of two coordinating fleece fabrics (a yard and a half makes a nice square blanket). Then you simply line up the two fabrics and make cuts around 5-7" all the way around and tie them together in double knots (one strand of top fabric and one strand of bottom fabric). I recommend starting your cutting at the corners (i made a little diagram above on the orange paper). It isn't essential to do it that way but it makes for a nice even transition the whole way around. These blankets are some of my favorites to make because they come together so quickly, it's pretty much instant gratification... gotta love that!
 Let me know if you make one!